My Pet Turtle - Part 6 - The Palace

February 2nd, 2025. Sandy loved to give me that cold RBF.
This blog has been a long time coming, but it’s finally here: A breakdown of Sandy the Turtle’s new princess palace. In late 2021, we had the great fortune of buying a house and beyond the obvious priorities when it comes to moving to a neighboring town from a tiny apartment to a new and much, much bigger house, was having a plan to get Sandy from one place to the other in the dead of winter. Thankfully, the apartment and the new house were a mere 10-15 minutes apart and we quickly decided to keep the apartment 1 month longer to give us time to situate ourselves, take our time, and get a brand new turtle place place built. And so, poor Sandy was left all alone in the apartment for most of January 2021 while I toiled away after work building what would becomes one of the best things I have ever made. I made the entire thing myself and had to make a few adjustments on the fly, but largely was able to stay on plan and schedule.
I previously made a blog about Sandy’s last tank, which I had to throw together in less than a week right before Jess & I were married. I learned A LOT from that set up, but it was also extremely successful: Water changes were easy, the filter was low maintenance, and Sandy was super happy (As happy as her cold, judgmental face can be anyway). I wanted to recreate all the best parts of that enclosure and put it in a much more aesthetically pleasing package. Jess and I were very worried about putting Sandy in a prime living area. I really wanted something we could live with and around for years. When we bought the house, the only logical place to put her was in the dining room. I knew that we would only be using the dining room for formal sit-down dinners (So sparingly) and that it was roughly south-facing, so there would be a decent amount of natural light on the basking platform in the morning hours. I made my measurements, put together a bill of materials, and got to work. I made the plan on December 1st 2020 and started building on Jan 1st 2021. It took until January 22nd to finish to get Sandy in the tank, but I didn’t finish the details until later in 2024.
Here is a very detailed account of how it came together!
As always the plan and materials come first. I started with the most economical option for holding the water: The Rubbermaid 100 gallon Stock Tank. I had used this as the basis of my previous build to great success and you just can’t beat the price. I also feel like it is much closer to a natural environment for Sandy as it could allow her to dive in the water and not feel your eyes through glass or anything like that. Sandy, being somewhat shy and antisocial, seemed to really enjoy being able to dive into the deep black opaque container, so it was a no-brainer to reuse the concept. However, these things are not attractive and this time I was all about aesthetics. My mission would be to construct something that looked like it was more or less built into the house. To that end, I decided to essentially encase the whole stock tank in wood and match the color and trim in the dining room. The house was built in 1900 and had terrific, if simple woodwork throughout. Thankfully, the dining room had a chair rail and was painted a gloss white on the lower half of the walls. White is easy and cheap. If I had to match, unpainted 120+ year old wood, that would be an entirely different and crazy process sourcing the materials, although the design would have been the same.
Considering we were moving out of the apartment, I chose to leave my tools behind and do most of the messy work where I wouldn’t necessarily have to clean up after myself every day. Just more efficient!
Step 1 was to cut down several pieces of plywood to shape including a big oval cutout where the stock tank would sit. I also planned to create a bigger homemade filter and I wanted that to be as hidden as possible, so I cut a hole for the filter bucket to sit in as well. This plywood would be the top and also accommodate a basking area. At first, I had the whole thing symmetrical with the basking area the same size as the opposite side where we would have the filter, food, etc., but when I showed Jess my plan in the dining room, she asked that I not go across the entire window, so I cut off about 9 inches of the basking area. This caused a few complications, but was ultimately fine in the end.


Step 2 was to use some pretty cheap and wonky wood to create ‘legs’ that would support the top I had created. I used the cheap wood because I knew it would be covered up in the end. If I had a piece that was a little straighter and square compared to the others, I used those as the corners. The only trick part about this process was that I was cutting these in a different place from where they would be installed. The idea was to have the ‘top’ meet the lip around the edge of the stock tank, but not to support the stock tank. If, for instance, the tank was lifted off the floor even by a little bit, the weight of the water would weigh down on the top and might crack or warp it over time.

At this point, I should point out the other factor when it comes to placement. It’s important to consider that a gallon of water weighs just over 8 pounds, so a full 100 gallon stock tank was going to weight 800 plus the tank plus whatever else. When I considered where to put the tank in both our old apartment and in the new house, I went down stairs into the basement to consider the structure and if the floor could take the weight. Putting such a thing in the center of a room, 10’ or more away from main structural wall or beams in a 120 year old house will at minimum sag the floor and at worst collapse it over time.
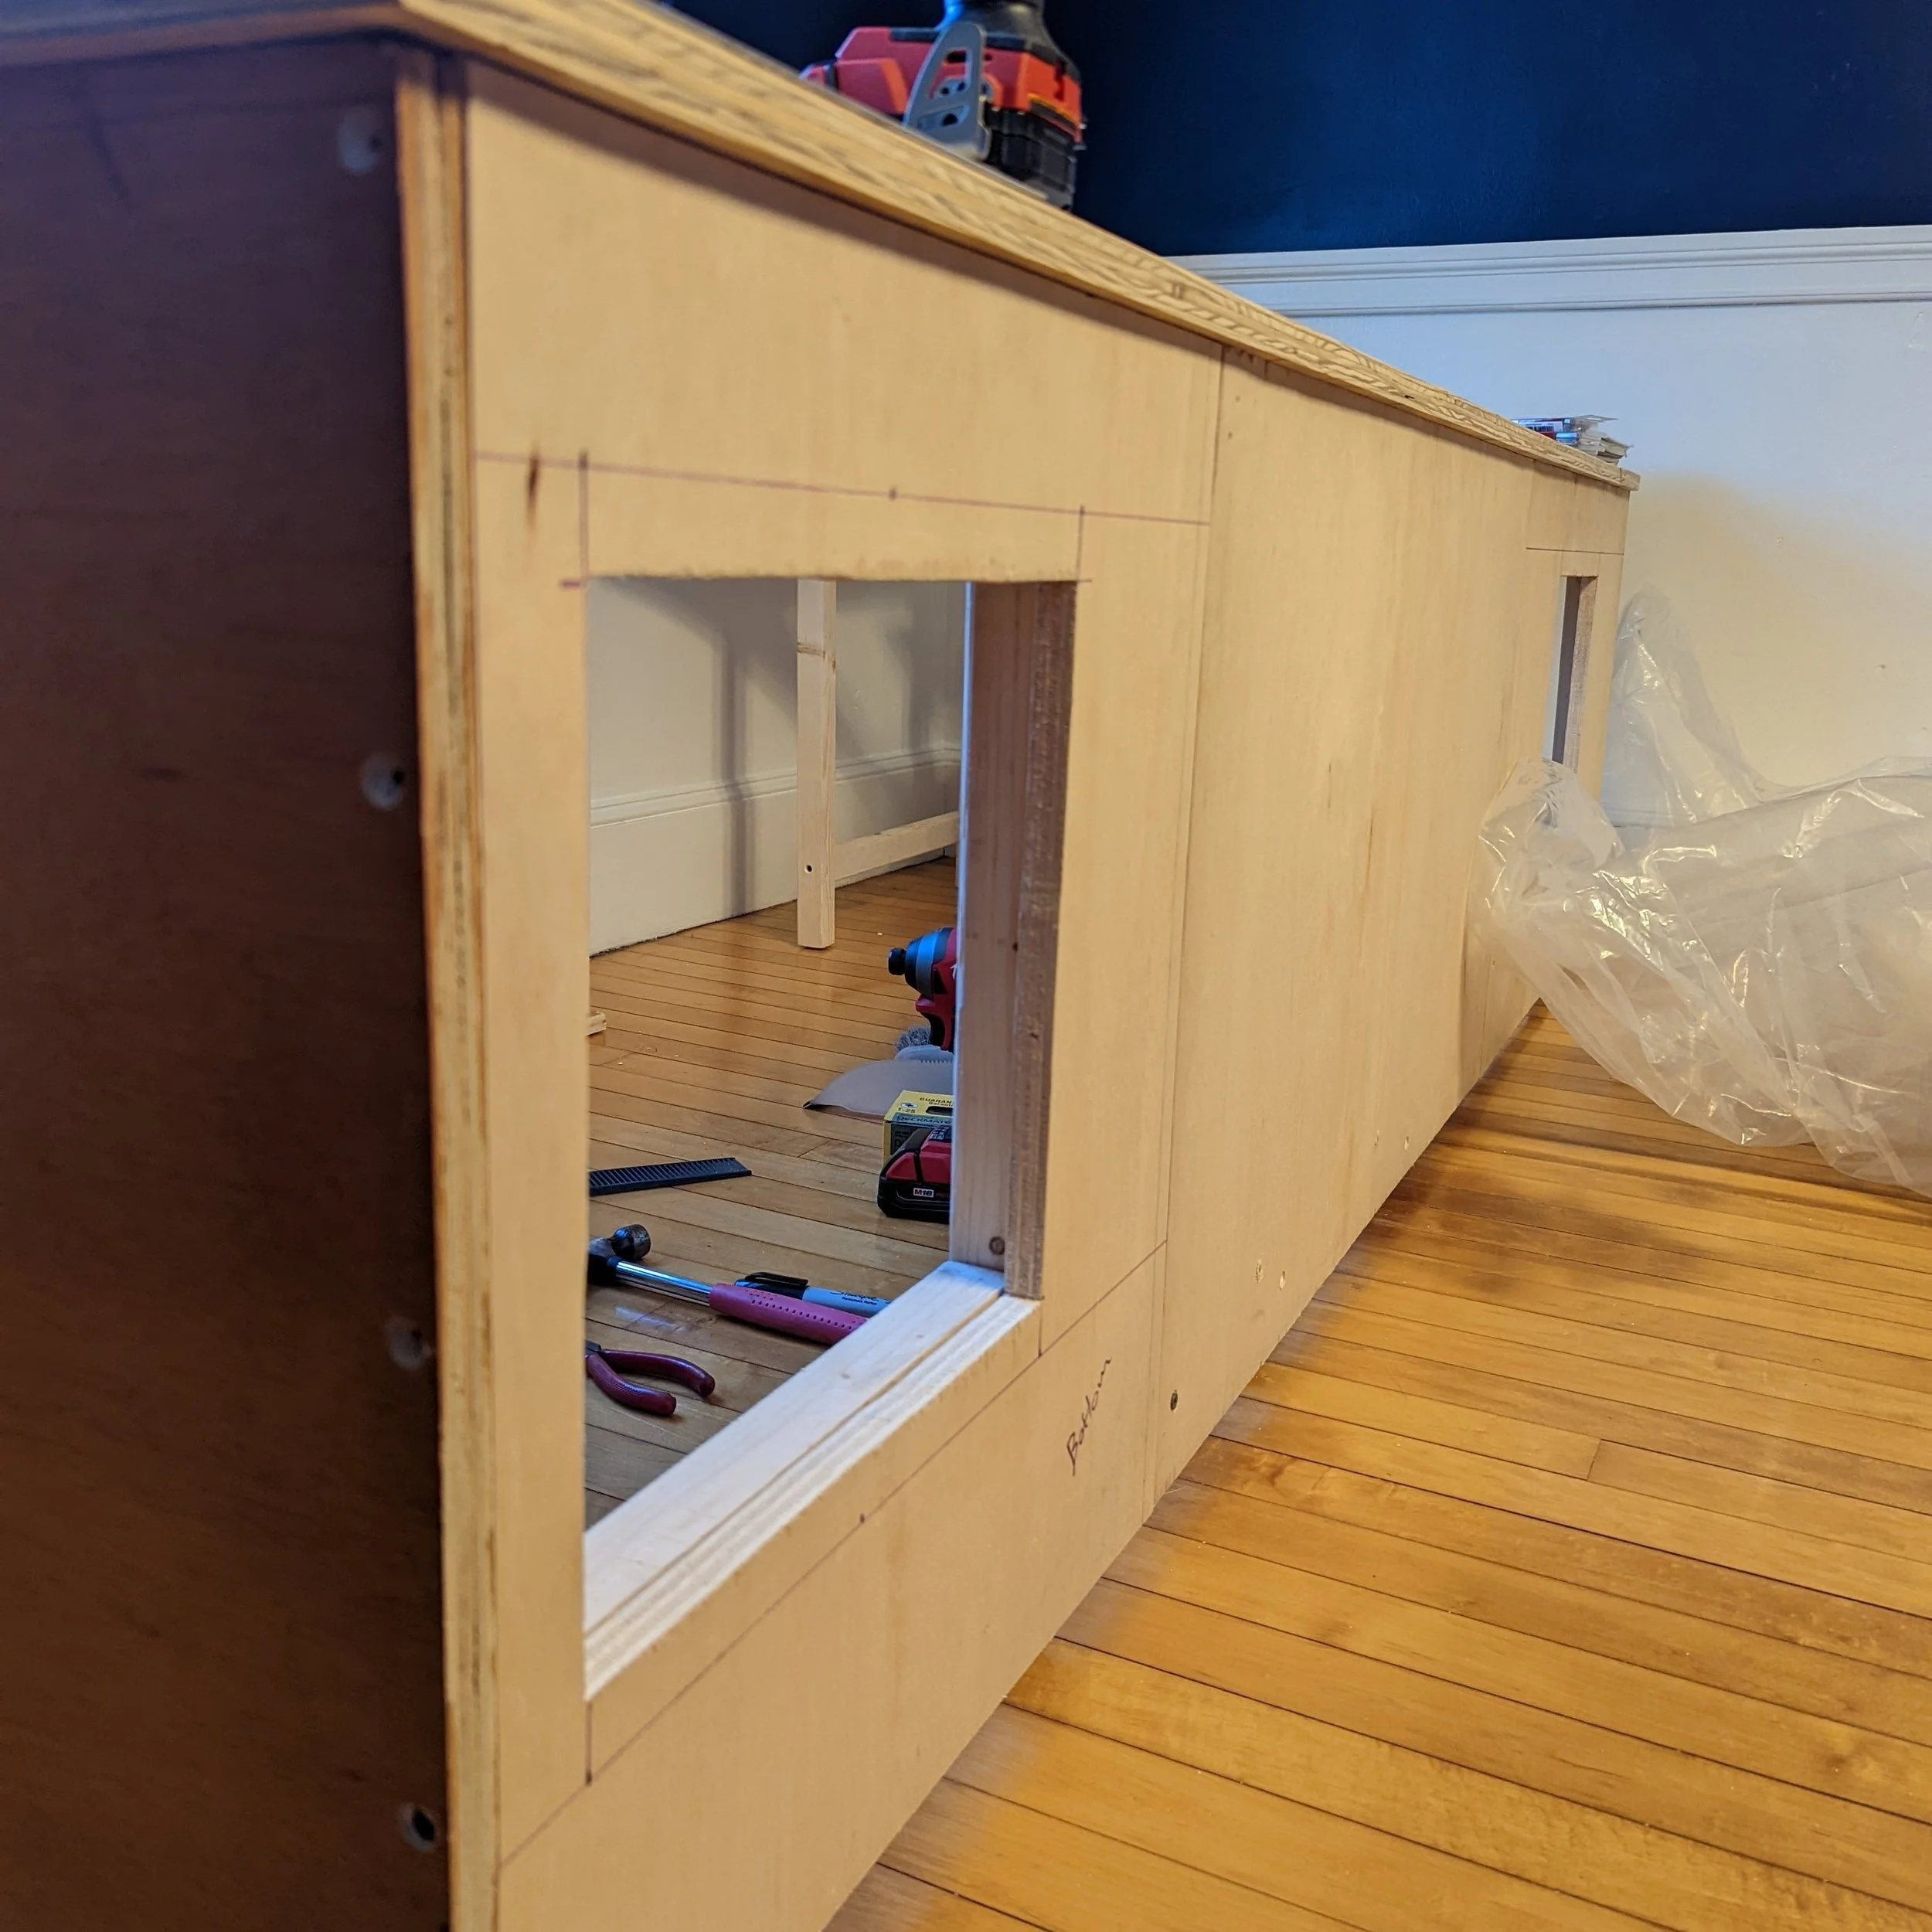
Step 3 was to create plywood walls that would cover the legs and provide some meat for the decorative trim to be attached. I also precut some openings so that most of the accessories and electrical could be accessed underneath the top and to either side of the tank. I would later (Much later it turned out) create nice doors to cover the openings. I made sure that these sides met the top but did not go all the way to the bottom (I was about 3/4” shy). I did this so I could have some flexibility when installing the future trim/baseboards and I could get them very tight to the floor in the dining room.
Step 4 - With all the ‘meat and potatoes’ structure completed, I brought all the pieces to the house and started to reassemble in the dining room. I had numbered all the upright legs to ensure I got them put together correctly. At this point, I dry fit the stock tank and the filter bucket to make sure I was close and then I actually slid everything aside.
Step 5 was a critical to why the stock tank suited my needs more than any glass container. The tanks are sold with threaded drain holes so you can empty them if needed. In my last build, I took advantage of this to install a PVC ball valve at the bottom of the tank and run a pipe out the side of the apartment so that it would be very easy to drain the water if there were an emergency or for weekly partial water changes. It saves SO much time compared to siphons or pumps or scooping the water out. 100 gallons is a lot of water. I wished to recreate this in the new house, so I enlarged the hole at the bottom of the stock tank (carefully) with a hole saw and bought the necessary fittings. I figured out the placement by dry fitting the tank into my structure and proceeded to drill a hole right through the baseboard and out of the house. This is not for the inexperienced or faint of heart and you need the right tools. You have make sure the path is clear of plumbing or electrical and your hole is drilled at the correct angle. In this case, I wanted the drain to be sloped 2-5 degrees to help it completely drain.


Step 6 was to cover the plywood top with cheap adhesive linoleum tiles. This would help it look nice, but also repel splashes of water. I think, if were to do it again, I would have used a water sealing product on the wood before sticking the tiles, but it is not entirely necessary. In any event, you don’t want water to be pooling onto the surface anyway as that will eventually find it’s way to the floor somehow. These types of tiles are easy to work with, but hard to cut. I used a combination of a very sharp utility knife and heavy-duty cutters. There were a lot of curves to cut and I would trace the shape on the paper backing (as opposed to the nice surface). I didn’t have to be super precise as all the edges were going to be covered by either the lip of the stock tank, or other trim.


Step 7 - Once the surface was completely covered with the tiles, I installed the plywood sides to close it all in.

Now for the fun part!
Step 8 - With the primary structure created and in place, it was time to make the whole thing beautiful. I wanted to give the sides of the enclosure some character, so I bought some textured wall paper. Warning! Wall paper sucks and it was very difficult to deal with. This paper had to be soaked in water and then left to rest for a few minutes before being applied. It took two tries on the first section I did to get it right. The rest went alright after that. It tended to be very fragile and easy to tear. I was very luck to get through it and those parts that did tear were very luckily behind where trim would be placed. Once that was all dry, I gave it all a coat of paint.


Step 9 - Trim time! I made vertical pieces of trim that went from the floor straight up 12 inches above the top of the structure as they would double as supports for the fencing I’d install later. Each of these pieces had a very complex outline for them to fit around the plywood. Once those were installed, it was all about the baseboards and other horizontal pieces. Thankfully the baseboard profile was very easy to replicate with items bought from Home Depot. I tried to paint all the pieces before installing and then painted everything with some finishing coats after installing.


Step 7 - I put the stock tank in for the final time. Placed a really old beach towel between the tank and the floor. This served two purposes: First, I needed to slide the tank into place, shoving the drain pipe out of the hole I made. Second, if for any reason we needed to remove the enclosure, I didn’t want to hurt the floor or do any damage beyond the hole I drilled. Once the tank and the surrounding structure was shoved into position, I chalked around the drain pipe outside to help keep the cold air out and I used shims to level the legs and the tank itself. In an old house, nothing is straight, so you can’t expect to put something down and have it be perfect.
Step 8 - Once all trim was installed and painted, I bought PVC channels and dozens of small screws to create ‘window frames’ to slide plexiglass into. I then cut the plexiglass to fit into each section and topped it off with another piece of the PVC channeling. I left the plexiglass and the top piece of the channeling loose so that I could slide the plexiglass out to access the tank for cleaning or to replace the plexiglass at a later date. Plexiglass will discolor in the sun after a time. It is really hard to cut plexiglass especially in a large sheet. I used a table saw with a very sharp new blade and patience. It’s definitely possible to do with manual tools, but it takes a lot of patience and precision. Let’s just say this was not a beginner project.


Step 9 - With everything beautiful there was the matter of providing power to everything. First, there was an outlet in the corner where I was building, but it was tied into several other outlets and had outdated wiring. I removed the outlet and pulled the wires. I then installed a new dedicated circuit in the breaker box and a new GFCI outlet (It is near water after all). It takes a decent amount of power to heat the water and provide adequate light and a heat bulb for the basking area. There is also a pump to get the water through the filter. To save a little money, I planned to use the pump that was already installed at the apartment but I decided to buy a new heater, so I could have the water to temperature before bringing her to the new house.

The rats nest
Step 10 - With the electrical all installed, now I could focus on the plumbing. Having a turtle in your care for two decades means that you have seen and tried pretty much every type and style of filtration out there and honestly, they all completely suck at their function and break very easily. My whole life changed when I saw a YouTube video about homemade filter solutions and proceeded to watch every video I could find on the topic until crating a filter out of an old cat litter bucket. The filter out performed everything I had used before and was easy to maintain. When I set about creating a new enclosure, I wanted to recreate that filter, but also size it up a bit. I had this idea in my head to incorporate a water fall of sorts, but it went sideways and leaked everywhere, so I’ll only describe the successful second attempt. In basic terms, your bucket needs to have several layers of filter media for the water to pass through to keep the water safe and clear. The way I situated my filter was to have the water fill the bucket from the bottom and as the water rose, it would pass through three different media types before reaching the top of the bucket and leaving through a pipe going through the side and back into the stock tank. There are other ways to accomplish this including using gravity (filling top to bottom) or something pressurized. The cons of course being if your gravity filter clogs, you are going to have water filling up and pouring over the sides and out the top of the filter. Bad! In a a pressurized setup, it doesn’t take much for something to spring a leak. The bottom to top, unpressurized bucket is safest in my opinion.


So this is how it goes.
Water comes into the top/lid of the bucket and goes straight down to the bottom of the bucket. I use a check valve to make sure that when the pump is stopped, the water doesn’t siphon back down into the stock tank which can cause it to over flow or it just makes disconnecting the pump for cleaning very messy.
I built a platform out of egg crate material that creates an empty gap at the bottom of the bucket for the water spread out. All the larger pieces of debris get trapped in this area. It’s also really important for the health of the turtle and for the good bacteria in the filter for the water to be oxygenized. To that end, I bought a clog free air stone and put that at the very bottom of the bucket in this gap area. The air also serves a secondary purpose: It helps spread the water out over the surface of the filter.
On top of the egg crate platform, I buy rolls of basic aquarium filter media and cute them to fit tightly against the sides of the bucket. This layer serves to remove all the ‘chunky stuff’ before the water rises further.
Next, I buy carbon pellets in bulk and put them in a mesh bag and lay it on top of the aquarium media. The carbon neutralizes ammonias from pee among other good qualities.
Around the carbon bag, I bought a very porous ceramic sticks that harbor the good bacteria that breaks down all the waste.
I fill the rest of the bucket with plastic bio balls that also serve as a great place for good bacteria to grow.
Finally, the water exits through a hose that runs out the side of the bucket and back into the stock tank.
The new bucket I used was from a hydroponics store (Combined with a hinged lid) and nearly double capacity at 13 gallons. I had cut a hole in the platform to accommodate recessing the bucket a bit so if wouldn’t be too prominent in the setup. I also used extra linoleum tiles on the top of the bucket to help it blend in a little more. The linoleum did not want to stick to the lid of the bucket, so I found some automotive button fasteners and snapped them into predrilled holes on each corner of the tile to keep them in place. To exit the bucket, I used a threaded port fitting on which I could screw in a tri-clamp adaptor. Tri-clamp is a common connection for food & beverage as well as biopharma that uses a clamp and a gasket to squeeze the ends together and create a very secure seal that is easy to take apart for cleaning. Clamped onto the adapter, I used a tri-clamp to hose adaptor and a short length of food-safe hose. The hose is a bit flexible and when floated with a couple of used soda bottles, will ride the top of the water as the water level rises or falls. The old set up just had the water pour out the side of the bucket and splash into the tank, but the noise was very annoying, so having the hose so close to the surface of the water helps keep the noise level down.


Step 11 - In order for Sandy the Turtle to move in, I had to create the perfect basking platform that included lighting and a ramp. When rushing to get her in the new house, I decided to set up temporary lighting that included a heat bulb in a clamp lamp as well as a florescent fixture hung from the window by string. For a ramp, I bought a cutting board and zip tied it to the edge of the stock tank in much the same way I did it in the last set up. To keep the ramp from sinking into the water, I zip tied an empty soda bottle to the bottom of the cutting board in a similar way I did the filter outlet hose. As the ramp was going to be supporting Sandy’s weight, I needed a bottle and I had to place it in the right place so that the end of the cutting board remained submerged so she could easily climb up it. I then created a mini ramp on the platform with a piece of closed cell foam topped with an extra piece of linoleum tile as the lip of the stock tank rises about an inch above the platform surface and it would prevent a drop and a potential for Sandy to flip herself over (Did happen in version 1). I stuck the foam to the platform using 3M Velcro strips. On top of the cutting board and mini ramp, I used a rubber bathmat to give Sandy some traction to get up and down the ramp. The bathmat and the cutting board will collect a small bit of algae but other wise repel most gunk and are easily cleanable or replaceable.


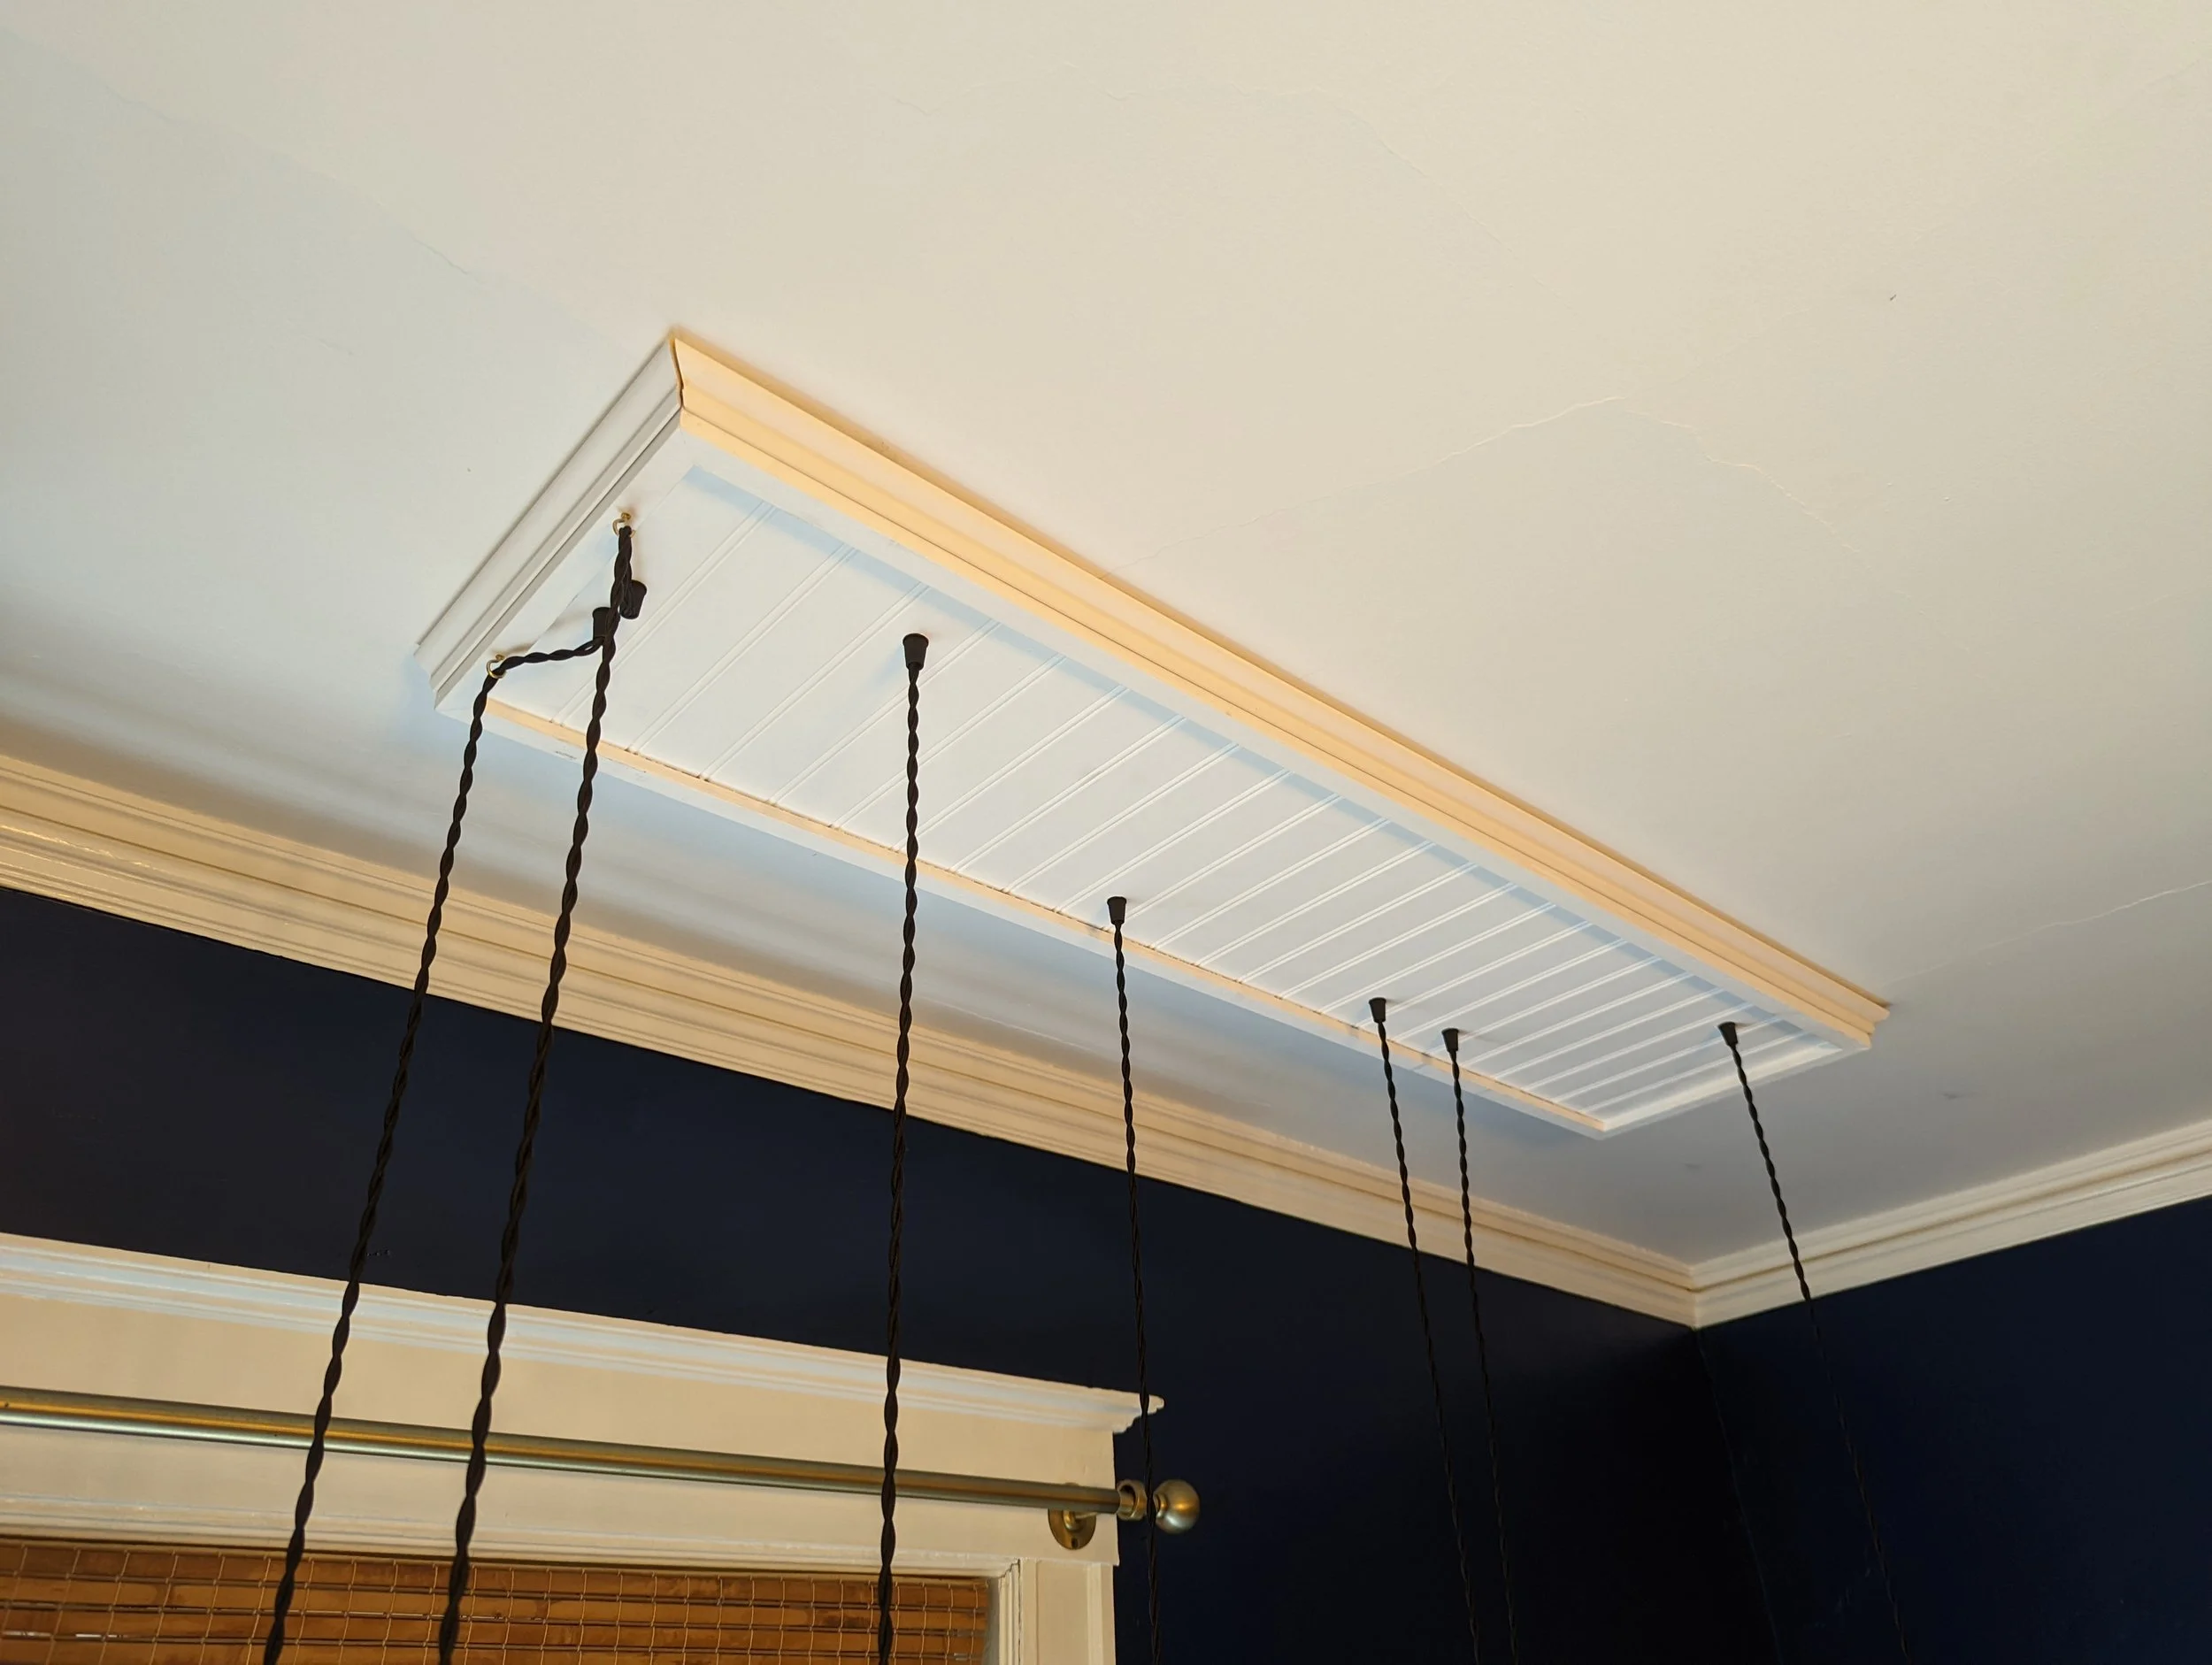
Step 12 - At this point, I had filled the tank and moved Sandy in and deconstructed the old set up at the apartment, but there were some additional details to work on. Most importantly, I had to create a more permanent lighting set up. I constructed a frame that I attached to the dining room ceiling and used ornamental black wires to hang several full-spectrum LED lights over the water as well as a heat lamp over the basking area. The whole fixture is connected to a timer underneath the tank that turns it off and on each day, but I did put a switch on the heat lamp as it is not needed at the height of summer and so it is easy to change out. I’ve been getting about 6-8 months out of heat lamp bulbs before they burn out. I would say that the LED bulbs are a little bit controversial to me as I’m not entirely sure they provide the necessary health benefits (Full UVA and UVB light), but they use less electricity and have a built in heatsinks that make them look more attractive than florescent bulbs. They also seem to last longer as florescent bulbs are supposed to be replaced every 6 months or so (They lose effectiveness over time). In my scenario, Sandy is situated by a window and most of the light is actual sunlight, so even if the LED bulbs are not 100% effective, she has adequate light to keep her healthy. Many folks would insert a comment here about algae and they would not be incorrect: When you have sun hitting your water, you are going to grow algae. In my case, the growth is slow and manageable. With the filter and regular partial water changes, the water is always clear. Algae is just not that big an issue for me.


Step 13 - For the first year plus, I had a number of other priorities, but I had to make some nice doors to cover the openings I left to store things under the tank. I decided to take some planks and use a dremel and knives to carve some nifty turtles. In the negative spaces left after carving, I found some cool copper-colored aluminum decorative mesh (For a lack of a better term). To get the doors to stay in place, I actually went with magnets. I felt like hinges and the door itself would get in the way if I had to reach way in there. The magnets also allow me to swap the doors back and forth if I want as the openings are the same size. Very happy with how they runed out and definitely finished off the design well. I also found some basic fence post caps online that I slid over the top of each upright. It was something that, until I did it, the uprights just felt like they were missing something.


Conclusion
Now, it seems that after three years, one of the plexiglass panels was lightly scratched and some of the wood has absorbed the paint, so I’ll have to do a little maintenance soon, but overall, I couldn’t be happier with how the whole thing worked out. It’s definitely a big conversation piece and Sandy has an incredible space for herself. This summer (2025), she will be 20 years young with a good many years to go, I hope. Here is hoping the palace can stand the test of time!
